 |
 |
||
|
|
||
Springs and struts are mechanisms that can control the size, placement, and behavior of Swing components during resizing operations. They are implemented in the SpringLayout class, a subclass of the Object class. Springs and struts are described in the specification titled SpringLayout API.
Later in this document, under the heading "Using Springs and Struts," you'll see how springs and struts behave in an application.
A SpringLayout object is a simple layout manager with about fifteen methods. The core method is the setSprings() method, which has the following syntax:
For the names and functionalities of the other variables that can be passed to setSprings() in the springs argument, see Swing's SpringLayout API API.
NOTE: The SpringLayout manager does not provide any methods or variables for directly setting struts. That's because a strut is not an object in its own right, but is merely the absence of a spring. For example, if an application does not specifically set a component's RIGHT_MARGIN_CAN_CHANGE variable, then the component's right margin cannot change, and a strut is said to be applied to the component's right margin. If this sounds confusing, don't worry; the following section shows exactly how springs and struts work together in Swing applications.
Although a SpringLayout object is a full-fledged layout manager, it doesn't do anything perceptible until the user of your application performs a resizing operation that expands or contracts the container of one or more Swing components. At that point, if a SpringLayout manager has been constructed, it goes into action, adjusting the sizes or the positions of the components inside the container to respond -- in whatever way you have specified -- to the new size of their container.
Before you equip a set of components with springs or struts, you must set the initial positions of the components. The most common way to do that is to place the components in their container and then call JComponent.setBounds(). Then, whenever a resizing operation is performed, the SpringLayout manager automatically adjusts the sizes or the spacing of the enclosed components, in accordance with whatever constraints you have provided to the SpringLayout manager.
When you use springs and struts to manage the behavior of a component, various kinds of things can happen when the component's container is resized, depending on several factors -- including the position in which the component is initially placed, what layout manager is used to lay out the component and its container, and what kinds of combinations of springs and struts are then applied to the component and to its container.
To illustrate how the SpringLayout manager works, let's take a look at a simple component layout that has been created using the BorderLayout manager.
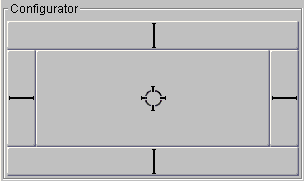
The following illustration shows how struts work when they are used by
themselves -- that is, without any springs -- in a BorderLayout. (Because
struts are actually nothing but the absence of springs, this picture also
shows how the BorderLayout manager would work by default in an ordinary
non-Swing application that was not equipped with either struts or springs.)
This picture -- a screen shot from the SwingSet example program that's provided
with Swing -- shows a button component displayed inside a BorderLayout display.
The horizontal and vertical bars inside the button component (which the
example program provides for illustration purposes only) show that the button
contains a horizontal strut and a vertical strut -- or, to put it another
way, the bars inside the button show that the button does not contain any
springs.
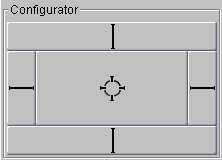
Because the BorderLayout shown in this illustration does not make use of springs, the button component that is shown in the picture behaves in exactly the way you would expect it to behave in an ordinary non-Swing application -- that is, a standard AWT application that makes use of the BorderLayout manager. In this example, as you can see the button's initial x/y position is initially set to nestle firmly against the inside edges of its container's north and west borders. Subsequently, when the containing component is resized (as shown in the right-hand part of the preceding picture), the button component does not move and its size does not change. Instead, the container's east border merely slides over the button, obscuring the part of the button that it covers.
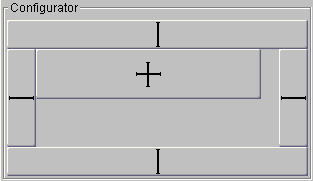
The next illustration shows how a button component behaves inside a BorderLayout
when the button is equipped with horizontal and vertical springs (which
are represented in the SwingSet example program by a circular icon partly
hiding a pair of struts). Because springs allow a component to change sizes
when the size of its container changes, the button component shown in the
illustration now fills the entire space inside its container's BorderLayout.
When the button's container is resized, as shown on the right, the button
shrinks to fit the reduced space that contains it.
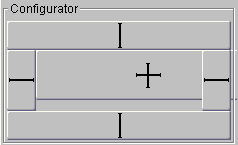
In the preceding illustration, notice that the container component's borders are still equipped with struts (or, to put it more accurately, are still not equipped with springs).That means that when the button's container is resized, the sizes of the container's north, south, east, and west borders do not change in the directions that are indicated by the solid bars in the illustration. Instead, the button inside the borders either shrinks or expands to fill all the space inside its four borders.
The final illustration in this specification, presented below, shows
how springs and struts can be used together in a Swing application. In this
arrangement, the button component that appears inside the BorderLayout frame
is equipped with struts -- that is, it has no springs. In contrast, each
of the four spaces surrounding the button (above it, below it, and to its
left and right) is equipped with a spring. (In the SwingSet example program,
the icons that represent these springs appear inside the borders of the
component that contains the button; actually, however, they affect the space
that surrounds the button component, not the borders of the component that
contains the button.)
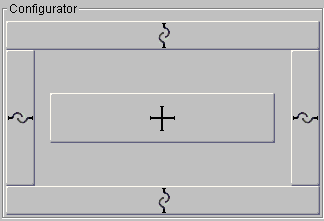
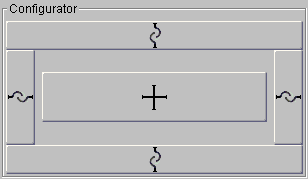
These two pictures show what happens to a button component when a set of springs and struts are set up in the fashion just described and the button's enclosing component is resized. Because the button in this example contains horizontal and vertical struts (i.e., no springs), its size does not change when its containing component is resized. But the spaces that surround the button do contain springs, so the button remains centered inside its enclosing component when its enclosing component is resized.
Notice that the button shown in these illustrations does not adhere to the top and left borders of its enclosing component, as did the button shown at the beginning of this section under the subheading "Using Struts." Instead, the button in these final shots remains centered inside its enclosing component, no matter how its enclosing component is resized.
Springs and struts can be used not only in the combinations that have been illustrated in this specification, but in many other combinations as well. For example, if you set a component's WIDTH_CAN_CHANGE variable and also set its LEFT_MARGIN_CAN_CHANGE variable, the component shrinks and expands as you resize its container, but always adheres to its container's right border. Similarly, if you set a component's HEIGHT_CAN_CHANGE variable and also change its TOP_MARGIN_CAN_CHANGE variable, you can watch the component's height change as you resize its container, but you can be guaranteed that the bottom of the component will remain firmly anchored to its container's bottom border.
You can experiment with many of the possible combinations of springs and struts by running the SwingSet program, which you can find in the examples directory that comes with swing. Just click the Springs & Struts tab and start playing!
For detailed information on all the methods and variables that can be used with the SpringLayout manager, see the SpringLayout API.
Version 0.5. Last modified 10/1/97.
Copyright © 1995-97 Sun
Microsystems, Inc. All Rights Reserved.
![]()