Install Jupyter Locally#
We want to set up an extensible system for Python development and data science in general, including Jupyter as one component. Here we only install the base system. From time to time tools and Python libraries can be added on demand.
Hint
A Python library is a collection of Python code files extending Python’s set of commands.
Conda and Mamba#
Before we start, we should become aware of two problems:
A Python development environment consists of many different tools, because many small tools are more flexible than one monolithic all-in-one tool. In principle, one could install all of them manually. On Windows systems this would be very time-consuming. Other operating systems, which adhere to the small tools approach (Unix-like systems), have a package manager for efficient software installation.
Different programming tasks could require different tools. Sometimes a tool prevents installation of another tool or of another version of itself. This is especially the case for some Python libraries, because some libraries depend on specific versions of others. Installing an additional library could require updating an existing one, but this in turn could corrupt dependencies of already installed libraries.
To circumvent both problems there exist package managers which create and manage multiple separate Python environments. So we may have several different sets of tools and libraries in parallel, switching between them whenever appropriate.
A widely used package manager for Python is Conda. It’s part of the Anaconda and Miniconda Python distributions. A Python distribution is a collection of tools and libraries for Python development.
Miniconda is a light-weight version of Anaconda with fewer tools and libraries pre-installed.
Note
Mamba is a faster, fully compatible alternative to Conda with a more non-commercial background. Corresponding light-weight Python distribution is Miniforge, which by default prefers packages from the community curated conda-forge project instead of from Anaconda Inc.
In 2024 Mamba and Miniforge are the better choice. Wherever the conda command appears in this book you may replace it by mamba. Wherever we refer to Anaconda Navigator you may use Mamba Navigator. Note that Ananconda Navigator has some additonal comfort features for Windows users (creation of app menu entries, for instance).
Create a Python Environment#
At the moment there is only one Python environment on your system, called base. Don’t install additional packages to this environment. Create a separate environment for each kind of task, for instance, an environment you use to work through projects and exercises in this book.
Task: Create a new Python environment ds-book. Either run conda create -n ds-book in a terminal or go to ‘Environments’ page in Anaconda Navigator. Then click the plus button and follow the GUI instructions.
To switch between environments use Anaconda Navigator or run conda activate environment_name in a terminal.
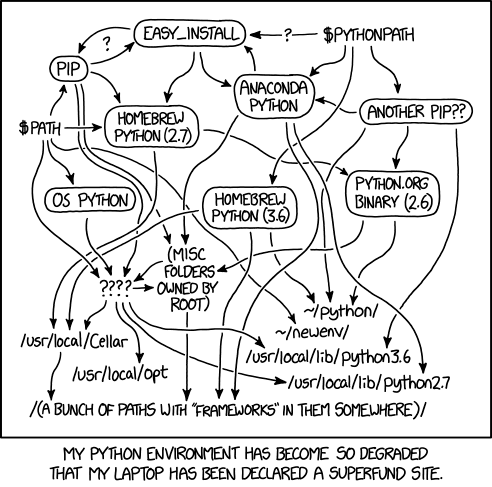
Fig. 83 The Python environmental protection agency wants to seal it in a cement chamber, with pictorial messages to future civilizations warning them about the danger of using sudo to install random Python packages. Source: Randall Munroe, xkcd.com/1987#
Install JupyterLab#
Now that we have a Python environment, it’s time to install Jupyter.
Task: In Anaconda Navigator set package filtering to ‘All’. Then head for ‘jupyterlab’ in the package list and mark it for install. A click on ‘Apply’ starts installation. Alternatively, run conda install jupyterlab in a terminal (make sure you have activated the correct environment).
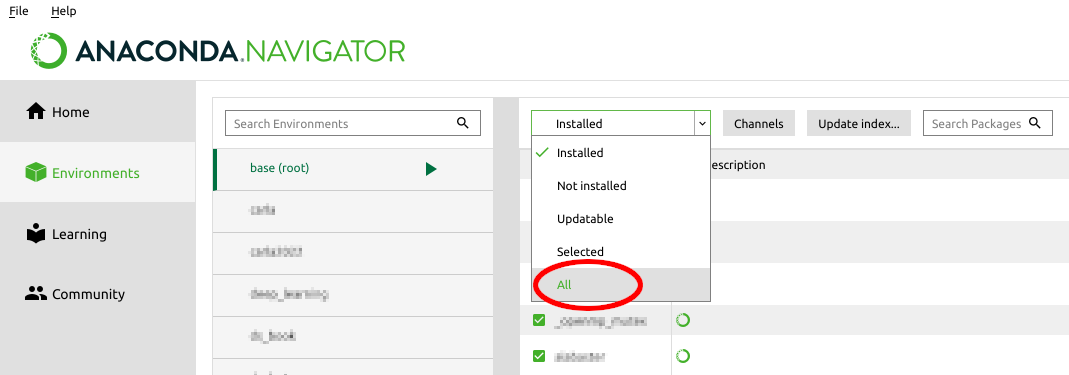
Fig. 84 The filter dropdown provides several filters for the package list.#
Note
Although you selected only one package for install, many more will be installed due to dependencies. JupyterLab requires a number of other packages and those packages may require others again. Conda manages such dependencies for us.
Launch JupyterLab#
The Home page of Anaconda Navigator shows a launch button for JupyterLab. Make sure you have selected the correct environment in the dropdown above the launch buttons.
Task: Launch JupyterLab via Anaconda Navigator or from the command line: jupyter lab.
Freshly installed JupyterLab lives in the environment you installed it in. Creating a new Python environment requires to install JupyterLab in this environment, too (if you want to use JupyterLab there).
Default behavior of JupyterLab is to show you your home directory and to disallow visiting directories outside your home directory via JupyterLab. To access a different directory, run JupyterLab from a terminal. Then JupyterLab will show the directory active in the terminal when launching JupyterLab.
Install Python Packages#
There’s already a basic Python installation in your environment. So you can use Python in JuyterLab. Additional packages (math, visualization,…) can be installed on demand in the same way we installed JupyterLab. Always keep an eye on the environment name when installing. So things will end up in the correct environment.
Hint
Next to Conda there exist other package managers. A very prominent one is Pip. Conda automatically installs Pip in each environment. To install a package with Pip simply write pip install package_name in a terminal. Conda will take care of packages installed with Pip, too.
Some packages are only available for install with Conda or only for install with Pip. So both package manager have to be used in parallel.
JupyterLab Desktop App#
Recently, a JupyterLab Desktop App has been released. This brings the look and feel of usual GUI apps to JupyterLab’s start-up process. After start-up there’s no difference to browser based JupyterLab.
Handling of different Python environments is somewhat more difficult than with plain JupyterLab.